Content on the internet is rendered on your web browsers because it is written in a format that browsers understand. HTML (HyperText Markup Language) is the standard format for web content.
The following is a simple HTML document:
<html lang="en">
<head>
    <meta charset="UTF-8">
    <meta name="viewport" content="width=device-width, initial-scale=1.0">
    <title>My Blog Post</title>
</head>
<body>
    <h1>Welcome to My Blog</h1>
    <p>This is my first blog post.</p>
    <p>Stay tuned for more updates!</p>
</body>
</html>
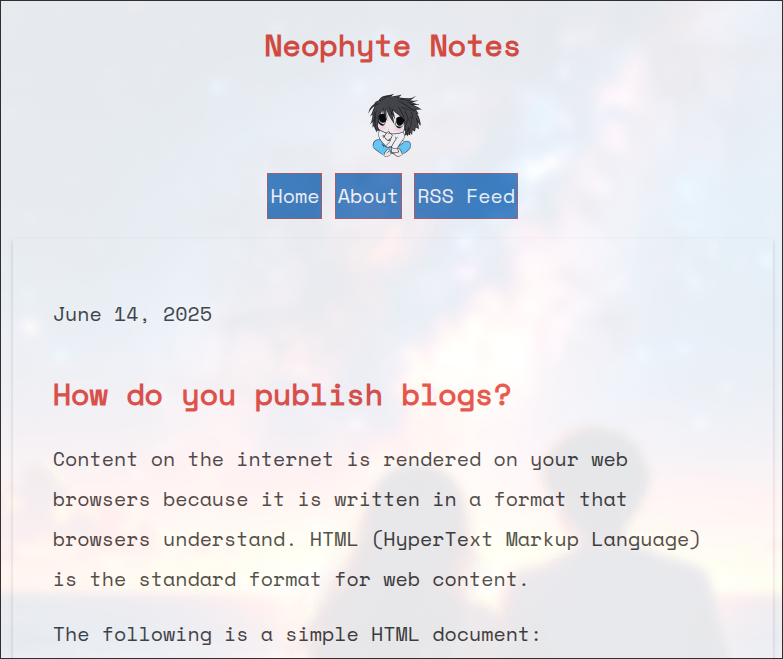
It consists of bunch of tags that define the content and the hierarchichal structure of a page. You can copy paste the content above into a file named index.html and open it in your web browser to see how it looks. It should show something like this

Now, if you see the address bar, it should say something like file:///path/to/your/index.html. This means that the file is being served from your local machine using the file:// protocol. To make it accessible on the internet, you first need to convert it into http:// protocol.
Doing that is easy, you have to create a Web server and serve the index.html file using that. A web server is a software that listens to requests on a specific port on your machine. It then sends the contents of the requested file back to the browser using the http:// protocol.
We can use the built-in python web server to do this. Open a terminal, navigate to the directory where your index.html file is located and run the following command:
$> python3 -m http.server 8000
You should see the following on the terminal
➜ python3 -m http.server 8000
Serving HTTP on 0.0.0.0 port 8000 (http://0.0.0.0:8000/) ...
Now head over to your web browser and type http://localhost:8000 in the address bar. You should see your HTML page rendered in the browser.
At this point, you could ask your friend to open the same URL in their browser, and….. they will see this

So what happened is that, your computer is only accessible from your computer. When your friend tries to access localhost, they see something else. What you now need is a Domain name for yourself and redirect the traffic for requests to that domain to your computer.
My previous article on Domain Name System explains how to do that. Once you have a domain name, you can point it to your computer’s IP address and your friend can access your web server using that domain name.
Except - don’t do that. Exposing your personal computer to the internet is not a good idea. Instead, you can rent a computer from a cloud provider and run the web server on that machine. Such a computer doesn’t need to be powerful and should be very cheap to rent. These computers will always be on and you don’t have to worry about keeping your personal computer online.
Now lets assume you have rented such a computer, logged into it and created a file named index.html in your directory, started a web server, created a domain name and pointed it to this computer. You can now share the url http://my-domain-name.tld with your friends.
Except - they will now see this

Their browser is now screaming that this is a insecure connection. I lied when I said that you can use http:// protocol. Instead, what you really need is an https:// protocol. You need to prove to the browser that whatever the browser sees is indeed coming from my-domain-name.tld and not some other website. This proof cannot be served via http and instead requires https.
In order to be https://, you need to be certified by a Certificate Authority (CA). A CA is an organization that issues digital certificates to verify the identity of websites. You can get a certificate from a CA and install it on your web server to enable https. Let’s Encrypt is a free CA that provides certificates for your domain name. It is widely used and trusted by browsers.
The simple example using python code no longer cuts it and at this point, you should just give up. Seek help from a tech-savvy friend or a professional to set up your web server with https on your rented computer.
But if you are really interested to know how to do it yourself, then here are the steps. First go and install Certbot, which is a tool that helps you obtain and install SSL/TLS certificates from Let’s Encrypt. What is a TLS certificate you ask? it is just another fancy name for the certificate. You should be familiar with updating nameserver records on your domain registrar and……, wait a minute, you first need to learn how to run the nginx or apache web server software. Let me explain how to do that first …

And thats it. So simple!
In summary -
- Create
.htmlfiles with your content. - Register a domain name for yourself and get a certificate provisioned that identifies your domain.
- Run a web server to serve those files over
http(s)://protocol using the certificate you got in the previous step. - Copy your files to the web server directory so that they can be served to the world.
How do I do it
Now that you know everything you need to know, to publish a blog from scratch, I’ll tell you what I do.
The fundamentals are the same, however handcrafting .html files is tedious. Also, you need to add some bling to your site with colors and animations and formatting and so on. The styling of the page is done using CSS (Cascading Style Sheets) and the animations are done using JavaScript. And so you would have to create some .css files and .js files respectively to make your site look good.
I offload the content generation work to a static site generator (SSG) software. (You don’t have to create .ssg files now, this is different). The software allows me to write my content in a simple format called Markdown - (written in .markdown or .md files). So suppose I want to write a blog about publishing blogs, I would write a markdown document with the following content
---
layout: post
title:  How do you publish blogs?
---

Content on the internet is rendered on your web browsers because it is written
in a format that browsers understand. HTML (HyperText Markup Language) is the
standard format for web content. The following is a simple HTML document:
And this automatically creates a new entry in the list of posts on my blog.
And at the same time render the individual post as well in its dedicated link.
The SSG software requires that I also specify the layout of all the pages in a separate file (for example the name of the site, and the logo etc at the top) so that it copies it over to all the posts. Hence, setting up the blog in this way entails a time-consuming one-time effort. Once things are set up, I can just write my content in markdown files and then generate the site.
Well, before I generate the site, I would want to see how it all looks. So I run the following command on my terminal to run a live preview of the entire site while I’m developing. Whenever I make changes to the markdown, it is automatically applied and I can see the changes in real-time.
$> bundle exec jekyll serve
Configuration file: /home/chips/projects/bbb/_config.yml
            Source: /home/chips/projects/bbb
       Destination: /home/chips/projects/bbb/_site
 Incremental build: disabled. Enable with --incremental
      Generating...
       Jekyll Feed: Generating feed for posts
                    done in 0.343 seconds.
 Auto-regeneration: enabled for '/home/chips/projects/bbb'
    Server address: http://127.0.0.1:4000
  Server running... press ctrl-c to stop.
Then I visit http://localhost:4000 on my computer and see how it looks as I edit my new post.
Once I’m happy, I run the following commands to copy over the generated site to the web server directory of the rented computer I have.
$> bundle exec jekyll build
$> rsync -Pr _site/ potato@neophyte.me:~/site/blog
The above commands creates the site and copies over the entire site to the neophyte.me server using the rsync command.
This automatically updates the https://blog.neophyte.me website.
I can time how long it takes for the above commands to run - which identifies how long it takes to publish a blog post. To do that, I will first copy the 2 commands to a single script called deploy.sh and then run it with the time command.
$> time ./deploy.sh
real	0m1.236s
user	0m0.572s
sys	0m0.133s
The important part is the time tagged as real. In this case it is 0m1.236s, which means it took 1.236 seconds to publish this blog post.
So that is my workflow now a days - I write a blog post in a simple markdown format that generally reads like a text file and then once I’m happy, I update my site in about 2 seconds.